Saturday, November 21, 2009
Homemade Peppermint Patties
I have been freelancing designing jewelry for a big fashion company, and every afternoon around 3 we make a run downstairs at the deli next door for some pick-me-up treats. Although I bring some healthy snacks from home, sometimes life calls for candy...and my personal favorite is York Peppermint Patties. The combination of minty, melt-in-your-mouth, and chocolate always gives me the candy/sugar rush I need to get back to designing.
After a few weeks of admitting my peppermint patty addiction, I decided that it was time to make my own and better control the ingredients in it. (And to make enough of a stash for me and my co-workers for finishing up the collection.) I researched a few recipes to create my own version, and found a terrific place to start in David Leibovitz's The Perfect Scoop. (An ice cream book that is one of my favorites).
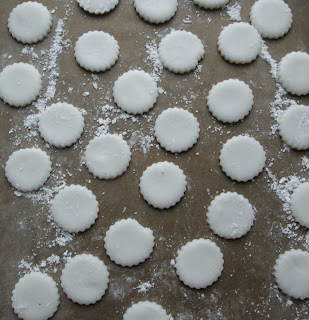
*note..I only took pics up to the drying out phase, because after I made the first patty I was in a trance to eat them all up and forgot. They do look like the real thing once made.
The trick with these is to make sure you roll them super thin, and when they air-dry to make sure you flip them once or twice so that both sides of the patty get a crust. When you see how easy it is to make these, you will never buy them again! They also are perfect for chopping up and sprinkling on top of a cupcake for a holiday type mood, or layering in a cake.
Homemade Peppermint Patties
2 cups sifted organic powdered sugar
3 tablespoons organic light corn syrup (Whole Foods has a private label brand made with non GMO corn)
2 teaspoons water
1/4 teaspoon peppermint oil or extract
8 ounces bittersweet, or 70% dark chocolate, such as organic Green & Black
extra powdered sugar for dusting
1. Line 2 baking sheets with parchment paper. Sprinkle with a dusting of powdered sugar.
2. In a medium sized bowl, add corn syrup, water, and peppermint oil.
3. Slowly add powdered sugar, stirring until it is mixed, then using your hands, knead it into a ball. It will be coming apart at first, but with some firm kneading, it will soften and turn into a minty ball.
4.Using a rolling pin that has been lightly dusted with powdered sugar, place the ball on one of the sheets lined with sugar. Roll dough, making sure to add a sprinkle of sugar here and there so nothing sticks, until it is 1/4" thin, or even thinner. (Remember After 8 mints???? you could go there)
5. Using a small round cutter dusted with powdered sugar so it does not stick, cut out rounds in the dough and place rounds on second baking sheet.
6. Once all rounds have been cut, they need to air dry so the patties get a hard crust, about 4 hours. You could leave them over night as well.
7. To dip in the chocolate, set up a wire rack over a piece of parchment paper. Melt the chocolate in a double boiler by placing small chopped pieces in a bowl over a pot of boiling water...or use your microwave in 20-30 second bursts, stirring frequently.
8. Using a fork, place a patty on top and dip in the chocolate, or use two clean fingers to wipe each side with chocolate, then place on the wire rack.
9. Place wire rack in refrigerator to let set, about 5 minutes.
10. Keep cool and well wrapped, we had the whole batch in our house for less than 2 days, they were that good!
Mela's Cake
A princess/Jean Paul Gaultier inspired cake for Mela...a friend of Clyde's. Chocolate cake with pink frosting, and some glittery painted details, sugarpaste flowers, emerald green gelatin sequins (see how these experiments come in handy!) and a glitter gold gelatin sequin as her belt.
I even did a quick haircut to match Mela's.
Happy Birthday Mela!!
xo
stained glass cake
I trust my intuition more than I know...and today while I was frosting a cake for a birthday, I still was unsure what exactly the decorations were going to be. The cake is a red velvet with cream cheese vanilla frosting, and for some reason, the cream cheese makes the flowers become soft, and they just don't look right.
I found myself tinting some frosting black, and piping flower 'doodles' that I usually scrawl on paper or notes which are flowers with leaves in all kinds of shapes. At first I thought to try and handpaint the insides of the flowers, but then had that moment where I realized the leaf shapes were almost exact to my gelatin flower experiments.
Placing gelatin leaves and even some sequin experiment leftovers on the petals created a stained glass effect, and perhaps even a Marni jewelry look too??? Then I thought about Clyde and Ruby's book that my dad gave to them. It was his favorite book from childhood, Harry the Dirty Dog. I realized that the graphic quality from that book may have subliminally inspired this kind of look too....
Sunday, November 8, 2009
Lady Caramel Apples
Caramel apples have been on my mind ever since the leaves first started to turn golden, and right away when I entered the farmer's market I laid my eyes on the small baskets of Lady Apples. Lady Apples are miniature apples which are sweet and crisp, (unlike Crab Apples) and perhaps the most perfect fruit for a child.
paper sticks inside Lady Apples waiting for caramel
I do enjoy the sour/sweet combination for a caramel apple, but knew that the kids would like the sweeter variety, plus it meant that I could use a few leftover for their lunches. Researching many kinds of caramel apple recipes, I found one on Heidi Swanson's 101 Cookbook site that uses honey instead of sugar, an idea that seemed perfect for apples. The recipe took around 10 minutes to make, and the result is a very sweet, honey flavored caramel. Using the mini apples makes it just the right amount of sweet to apple ratio, and small enough to not feel too overindulgent.
If I had the farmhouse I dream about, I would search the woods for twigs to stick in the centers for a perfect looking caramel apple. Instead we used paper sticks for our perfect Fall snacks.
Caramel Lady Apples
(recipe adapted from Heidi Swanson, 101 Cookbooks.com)
11 Lady Apples (they typically come in a corrugated box, I used 11 and 5 leftover)
3/4 cup organic heavy cream
3/4 cup honey-I used a mild clover
1/2 teaspoon sea salt
special equipment- candy thermometer, wooden spoon
Preparation: Rinse apples, stick wooden or paper sticks down the stems. Place on parchment paper or Silpat and chill in the refrigerator. Also place a large bowl with cold water in the freezer.
1. In heavy bottomed saucepan, bring heavy cream and sea salt to a simmer.
2. Add honey and raise heat to medium high, so that it is on a constant boil. But you have to keep stirring constantly or else it will burn.
3. After a few minutes, clip the candy thermometer inside the pan, and stir frequently.
4.Once the temperature reads 255/260, remove cold water from freezer and place on counter top.
5. Remove pan from heat, and place inside bowl (but careful to not have any water get inside). This cools down the caramel instantly, so you have to dip the apples quickly.
6. Tilt the pan to one side, and using the other hand, dip the apple in and twirl, coating all sides. Place coated apple on parchment paper.
7. If you want, you can sprinkle some sea salt, or chocolate chips into the caramel.
8. Refrigerate to set the caramel, and if you like, you can serve them chilled so they are extra crisp!
Subscribe to:
Posts (Atom)