Saturday, November 21, 2009

Homemade Peppermint Patties


I have been freelancing designing jewelry for a big fashion company, and every afternoon around 3 we make a run downstairs at the deli next door for some pick-me-up treats. Although I bring some healthy snacks from home, sometimes life calls for candy...and my personal favorite is York Peppermint Patties. The combination of minty, melt-in-your-mouth, and chocolate always gives me the candy/sugar rush I need to get back to designing.


After a few weeks of admitting my peppermint patty addiction, I decided that it was time to make my own and better control the ingredients in it. (And to make enough of a stash for me and my co-workers for finishing up the collection.) I researched a few recipes to create my own version, and found a terrific place to start in David Leibovitz's The Perfect Scoop. (An ice cream book that is one of my favorites).


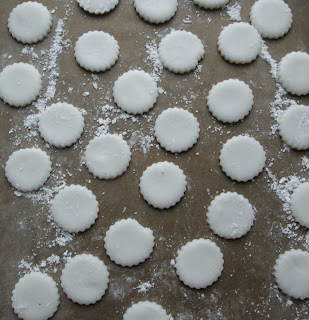
*note..I only took pics up to the drying out phase, because after I made the first patty I was in a trance to eat them all up and forgot. They do look like the real thing once made.
The trick with these is to make sure you roll them super thin, and when they air-dry to make sure you flip them once or twice so that both sides of the patty get a crust. When you see how easy it is to make these, you will never buy them again! They also are perfect for chopping up and sprinkling on top of a cupcake for a holiday type mood, or layering in a cake.

Homemade Peppermint Patties

2 cups sifted organic powdered sugar
3 tablespoons organic light corn syrup (Whole Foods has a private label brand made with non GMO corn)
2 teaspoons water
1/4 teaspoon peppermint oil or extract
8 ounces bittersweet, or 70% dark chocolate, such as organic Green & Black
extra powdered sugar for dusting

1. Line 2 baking sheets with parchment paper. Sprinkle with a dusting of powdered sugar.
2. In a medium sized bowl, add corn syrup, water, and peppermint oil.
3. Slowly add powdered sugar, stirring until it is mixed, then using your hands, knead it into a ball. It will be coming apart at first, but with some firm kneading, it will soften and turn into a minty ball.
4.Using a rolling pin that has been lightly dusted with powdered sugar, place the ball on one of the sheets lined with sugar. Roll dough, making sure to add a sprinkle of sugar here and there so nothing sticks, until it is 1/4" thin, or even thinner. (Remember After 8 mints???? you could go there)
5. Using a small round cutter dusted with powdered sugar so it does not stick, cut out rounds in the dough and place rounds on second baking sheet.
6. Once all rounds have been cut, they need to air dry so the patties get a hard crust, about 4 hours. You could leave them over night as well.
7. To dip in the chocolate, set up a wire rack over a piece of parchment paper. Melt the chocolate in a double boiler by placing small chopped pieces in a bowl over a pot of boiling water...or use your microwave in 20-30 second bursts, stirring frequently.
8. Using a fork, place a patty on top and dip in the chocolate, or use two clean fingers to wipe each side with chocolate, then place on the wire rack.
9. Place wire rack in refrigerator to let set, about 5 minutes.
10. Keep cool and well wrapped, we had the whole batch in our house for less than 2 days, they were that good!

Mela's Cake


A princess/Jean Paul Gaultier inspired cake for Mela...a friend of Clyde's. Chocolate cake with pink frosting, and some glittery painted details, sugarpaste flowers, emerald green gelatin sequins (see how these experiments come in handy!) and a glitter gold gelatin sequin as her belt.
I even did a quick haircut to match Mela's.
Happy Birthday Mela!!
xo

stained glass cake


I trust my intuition more than I know...and today while I was frosting a cake for a birthday, I still was unsure what exactly the decorations were going to be. The cake is a red velvet with cream cheese vanilla frosting, and for some reason, the cream cheese makes the flowers become soft, and they just don't look right.


I found myself tinting some frosting black, and piping flower 'doodles' that I usually scrawl on paper or notes which are flowers with leaves in all kinds of shapes. At first I thought to try and handpaint the insides of the flowers, but then had that moment where I realized the leaf shapes were almost exact to my gelatin flower experiments.


Placing gelatin leaves and even some sequin experiment leftovers on the petals created a stained glass effect, and perhaps even a Marni jewelry look too??? Then I thought about Clyde and Ruby's book that my dad gave to them. It was his favorite book from childhood, Harry the Dirty Dog. I realized that the graphic quality from that book may have subliminally inspired this kind of look too....


Sunday, November 8, 2009

Lady Caramel Apples


Caramel apples have been on my mind ever since the leaves first started to turn golden, and right away when I entered the farmer's market I laid my eyes on the small baskets of Lady Apples. Lady Apples are miniature apples which are sweet and crisp, (unlike Crab Apples) and perhaps the most perfect fruit for a child.

paper sticks inside Lady Apples waiting for caramel

I do enjoy the sour/sweet combination for a caramel apple, but knew that the kids would like the sweeter variety, plus it meant that I could use a few leftover for their lunches. Researching many kinds of caramel apple recipes, I found one on Heidi Swanson's 101 Cookbook site that uses honey instead of sugar, an idea that seemed perfect for apples. The recipe took around 10 minutes to make, and the result is a very sweet, honey flavored caramel. Using the mini apples makes it just the right amount of sweet to apple ratio, and small enough to not feel too overindulgent.


If I had the farmhouse I dream about, I would search the woods for twigs to stick in the centers for a perfect looking caramel apple. Instead we used paper sticks for our perfect Fall snacks.


Caramel Lady Apples
(recipe adapted from Heidi Swanson, 101 Cookbooks.com)

11 Lady Apples (they typically come in a corrugated box, I used 11 and 5 leftover)
3/4 cup organic heavy cream
3/4 cup honey-I used a mild clover
1/2 teaspoon sea salt

special equipment- candy thermometer, wooden spoon

Preparation: Rinse apples, stick wooden or paper sticks down the stems. Place on parchment paper or Silpat and chill in the refrigerator. Also place a large bowl with cold water in the freezer.

1. In heavy bottomed saucepan, bring heavy cream and sea salt to a simmer.
2. Add honey and raise heat to medium high, so that it is on a constant boil. But you have to keep stirring constantly or else it will burn.
3. After a few minutes, clip the candy thermometer inside the pan, and stir frequently.
4.Once the temperature reads 255/260, remove cold water from freezer and place on counter top.
5. Remove pan from heat, and place inside bowl (but careful to not have any water get inside). This cools down the caramel instantly, so you have to dip the apples quickly.
6. Tilt the pan to one side, and using the other hand, dip the apple in and twirl, coating all sides. Place coated apple on parchment paper.
7. If you want, you can sprinkle some sea salt, or chocolate chips into the caramel.
8. Refrigerate to set the caramel, and if you like, you can serve them chilled so they are extra crisp!

Saturday, October 17, 2009

Ladybug Cake


Today I made a very special cake... The 1st birthday cake for a little girl, shaped like a ladybug. As a mom of two, I get very sentimental about the importance of a first birthday party. Its a celebration on so many levels; for parents for making it through all the highs and lows, and for the babies now being official toddlers.

For the first birthday, simplicity and chocolate rule. She had a dark chocolate cake, frosted and filled with whipped vanilla buttercream. The "grass" is dyed coconut with some sugar sculpted flowers scattered for a true garden feel.

Happy Birthday Sylvie! Hope 1 is a great year for you!
xo

Monday, October 12, 2009

Kate and Avi's wedding


Kate and Avi were married today, and I loved working with them, because they were the essential Brooklyn couple. They were married at the Brooklyn Historical Society, had the reception at Frankie's in Carroll Gardens, had Sarah from Saipua do the flowers, and Mast Brothers chocolates as place settings. Kind of all the greatest hits in one...

They were unusual in the fact that they wanted a different cake flavor, suggesting hazelnut or rose as an option. We narrowed it down to something more crowd pleasing, coconut white cake with lime curd and whipped coconut buttercream. The cake uses 7 egg whites, and the curd uses 8 egg yolks, so after making endless batches of cake, it was really easy to make the curd.

For the decoration, they wanted a soft sage green color base, and sugar flowers with colors inspired by their real flowers they had at the wedding; ochre, sage, pumpkin, mauve. Beautiful fall colors.

placing larger flowers on cake first...

first stage of sugar flowers, drying them upside down so they look open when dry.

the sugar flower garden in bloom

I started the sugar flowers mid-week, wanting to give them a few days to harden. I dusted each center with a mixture of three petal dusts, to give the flowers a watercolor type feeling. I think when you use just one color it feels more mod and pop, but when you mix colors and can see bits of erratic shading, it feels more like something you might see in a garden.


After frosting the cake, I placed the flowers in a cascade effect, starting with the larger sizes. I placed smaller ones around them, and piped white centers on some of the flowers. I like the look of the hand dusting, but wanted to also ground the flowers a bit.

Kate and Avi bought this handmade cake topper that looked like them. With a sage green base, it fit perfectly on top of the cake.


Happy Wedding!
xo

Saturday, September 26, 2009

Luci's platypus cake


My friend Shin and I have a wonderful system worked out.
After meeting her in Chicago over 12 years ago, she now works in one of the top five salons in NYC and is a genius with curly hair. Since we are friends, we've moved past a proper payment situation to a barter--cakes for the family, for haircuts for the family. My favorite part of the whole deal is when her older daughter Luci dreams up her birthday cake.

Over the years, I have made a mermaid, a white cat, an Elmo cake for her little sister, and this year the idea finally became a challenge--a platypus. I had to do a bit of research to truly capture the subject matter, and found myself fascinated with the animal. Its in its own species category as its one of the remaining prehistoric animals. For reasons far beyond my understanding, Luci has an obsession with platypus, as do many of her alpha Manhattan classmates at the party.


Shin and her two daughters and husband are so loving and creative, and it makes me so happy to make a cake for someone who really appreciates it from both the mom and child perspective.
I will cherish this note from Luci forever. Makes my heart swell that I have really made it in the world.
Happy 7th Birthday Luci!

Monday, September 21, 2009

Kim's cake


My wonderful friend, Kim Ficaro has a birthday today.

one of Kim Ficaro's masterpieces

She is without a doubt, one of the most creative people I know, who transforms the ordinary into utter beauty.

She helped style and art direct my book, and I love seeing her work in food, design, and home magazine, catalogs, and newspapers. She uses flowers, found objects, and beautiful fabrics to make stunning arrangements. She also uses many textiles for tablecloths, or for accenting a plate of food. For her birthday cake, I thought about using an idea based in textiles.

I am designing a wedding cake for a textile designer named Libby (libbymarie.com) whose polka dot print is becoming a subconscious obsession of mine. I thought for the cake it would be fun to try and get a graphic, fabric inspired feel with painted polka dots.


Libby's hand printed textiles.
I love the loose and whimsical outlines on the polka dots, as well as the watercolor feel.
I used chocolate powder mixed with espresso for the brown "paint" and the cake has a base of espresso whipped buttercream. The fuchsia outline is vanilla buttercream, and I found a way to incorporate my edible gold sequins. The kids ate some of the circle gold ones, so I didnt have as many as I wished, but feel like it gives the cake a bit more glitz.


A perfect little cake for the small gathering tonight.
Happy Birthday Kim! Thank you for making the world a little bit more beautiful each day.
xo

Sunday, September 20, 2009

Gold Crush


My friend Alicia, who I used to work with and whose wedding cake I made in June, told me that she was making the jewelry for the Philip Lim fashion show. The show took place a few hours before my book signing, so for good luck (and because she is an amazing friend) she dropped off an extra necklace for my event.

Alicia is a master with metals, and she handmade each necklace out of thin sheets of metal with a process called electroplating to have it slowly crumple into what looks like, a crushed piece of paper. Except that it is shiny gold and hangs on the neck like a floating work of magical art.

She set the crumpled gold with faceted topaz glass stones and leather cord, so you can adjust it higher or lower. A really easy piece to wear that I loved at first sight.

the necklace

I wore it to my event with a Marni dress that had splashed of color and texture that reminded me of the necklace. At Kinokuniya, the crowd was a mix of bakers, designers, and lots of well dressed people. (The spill-over from the Anna Sui show that just let out).


johnny working the crowd

I felt inspired by the jewelry, the cakes, the people, and the gold. I thought sheets of gold leaf could be crumpled on top of a dark chocolate ganache frosted cake. Or thin sheets of chocolate could be softly sculpted by hand, and dusted with gold powder. Philip Lim called the show "Crush" so this is the crush cake dedicated to Alicia. xo

Saturday, September 12, 2009

Book Signing at Kinokuniya

My favorite bookstore in Manhattan is Kinokuniya. A Japanese bookstore that is a cultural goldmine of books ranging from crafts (making felt versions of French pastries for example), beautiful sewing, home, and design books, to carrying small tchotchke children's stickers, pens, and a cafe too. I fell in love the first time I walked in, and am so excited to be in the presence of such a great shop for my book signing next week.

Kinokuniya is right across the street from Bryant Park where Fashion Week is taking place, bringing all the elements together in my life; cake + fashion.

Wednesday, September 16, 6-7:30. Ave of the Americas between 40/41.
Treats and my fancy autograph.
Hope you can make it!
xo

Friday, September 11, 2009

My New York Times Debut


I am so honored to be part of Amanda Hesser's 'Recipe Redux' column this weekend. I have always admired her writing and am so excited to be in the New York Times.

http://www.nytimes.com/2009/09/13/magazine/13food-t-001.html


When she first contacted me in the Spring, it was the week that the Obamas broke ground on their new garden. I felt so inspired by this symbolic gesture of back-to-the-land eating, that I wanted to use an herb or something that would be flourishing in their garden by September. Thyme is one of those herbs that are so easy to grow, and can go either savory or sweet.

And I just love meringue cookies, they satisfy so many sensations at once.

I hope you enjoy the recipe!
xo

Thursday, September 10, 2009

Libby and Greg's wedding


I am so excited to be doing another wedding that will be held at Blue Hill at Stone Barns. The whole aesthetic and atmosphere of a working farm-to table makes my cakes so happy.

The palette for the wedding is simple; black, white, gray, and silver. The bride is a textile and stationary designer, and her style is whimsical and chic. (Hence the polka dot cake inspired by her work). We discussed doing small cakes for the tables.

She has vintage wedding toppers from her mom, and each cake would have one on top.
I recommended white Mosser milk glass cake stands for small cakes, since they make them in the 6" diameter, and they always look elegant.

We may even mix up the cakes with having plates of Goldies, but perhaps of gold dust, they will be silver.

It will be very beautiful!